Members and Groups Masterclass: Part 2
When creating and editing your profile pages, Members & Groups will become your new best friend, so over the next few days we’ll be talking you through how the page works and how to use it effectively.
Yesterday we walked through how to add new profile groups to your book, so now we’ll be discussing the different ways you can add or invite members to your book!
If you have spoken to your yearbook coordinator, they have probably spoken to you about the different editing styles you can choose – editor only or members logging in. But what do these actually mean?
Editor only – When an editor is solely inputting the data on behalf of the members. Eg, collecting profile answers offline and typing the information into the online book. Nobody other than the group of editors will have access to the yearbook.
Members logging in – Students can create and use a member account to upload photos and answer profile questions. Any information they fill in will automatically be added to their profile page, and it will be up to the editors to make sure that all content fits onto the page.
The way you interact with the members and groups page will depend on what editing decision you go for. We’ll start by explaining ‘Editor only’.

It’s important to remember that even though members will not be logging into the book, they will still need to be listed in the ‘Members & Groups’ area. This is because the editor will be filling in the profile on their behalf.
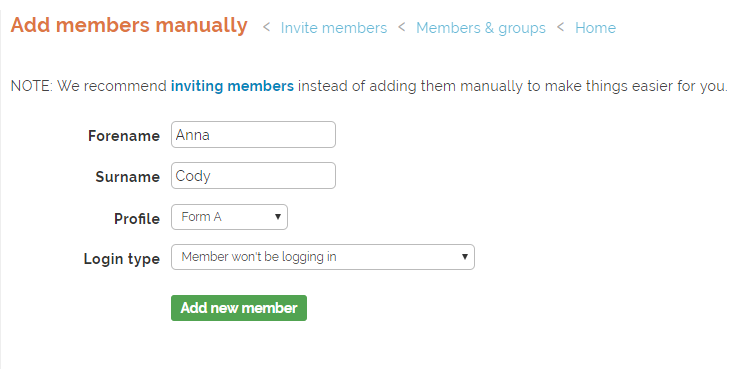
To add a member into the book you will need to click ‘Add or Invite Member’, and then select ‘Add Members Manually’. Here you will be able to type in the member’s name, before selecting a profile group and log in type.
Remember, you will need to keep the log in type as “won’t be logging in” so that nobody other than the editor has access.
After you have clicked ‘Add new member’ you can go back to your ‘Members & Groups’ area and you will see the new member added into your chosen profile group.

A yellow warning may appear letting you know that there are not enough profile pages allocated to the profile group, but in the early stages of creatiing a book we’d recommend waiting until you have added all of the members before sorting this out.
Once you have added all of the members needed you are ready and waiting for the next step – adding profile pages to your book.

If you have opted to have people log in and fill in their own profiles you will need to invite members to join the book. To do this you will need to click on ‘Add or invite members’ and then select ‘Invite by email’.
You’ll then see a page with a large text box for you to fill with a list of email addresses for everybody you want to invite. They will then receive an email with an invite code and instructions on how to join.
 Keep in mind that as soon as members create an account they will want to get started and fill in their profile answers and vote in award polls, so we recommend to hold off inviting people to join until you have completed this sections of your book.
Tomorrow we’ll walk through how you can add profile pages to your book, and how you can apply profile groups to existing pages.
Previous Members & Groups Articles:
Part One: Making Profile Groups
Part Three: Creating Profile Pages
Part Four: Profile Questions and Answers